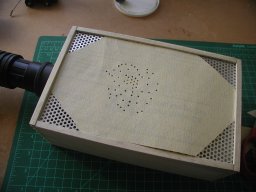
The sanding box can be used to collect dust during hand sanding, without applying sandpaper to its surface. In other words, hold the sandpaper in one hand and the object to be sanded in the other, suspended over the perforated aluminum. With the vacuum running, it will collect and remove any airborne debris.
For finer work, however, the design allows for more stability:
USE
|
- Cut in half a standard (9 x 11 inch) piece of sandpaper in the selected grit and place it on the perforated aluminum work surface.
- In practice, it does not appear necessary to use an adhesive to keep the sandpaper in place. The edges of the box and suction from the vacuum are sufficient. If you experience problems with slippage, lightly spray the non-abrasive side of the paper with artist's adhesive and then place it on the work surface.
 |
|
|
- Take any appropriately sized punch tool and pierce the paper multiple times. It is not necessary to punch holes over the entire surface of the paper. Use your judgment based on the size of the piece being sanded.
 |
|
|
- Attach the vacuum hose to the fitting. The vacuum I am using is relatively powerful. When I tested the operation I became concerned that the restricted airflow was causing overheating of the vacuum's motor. For that reason, I cut the beveled edges in the sandpaper. This does not seem to cause any problems with slippage and the vacuum does appear to be running cooler. It would be best to monitor this issue during extended use.
 |
|
The following pages contain detailed information on tools, construction techniques and the patterns. These have also been linked in the preceding pages.
I hope these instructions are useful. Any constructive comments or suggestions would be welcomed.


